[+/-]
This section provides a gentle introduction to programming with Connector/NET. The example code is written in C#, and is designed to work on both Microsoft .NET Framework and Mono.
This tutorial is designed to get you up and running with Connector/NET as quickly as possible, it does not go into detail on any particular topic. However, the following sections of this manual describe each of the topics introduced in this tutorial in more detail. In this tutorial you are encouraged to type in and run the code, modifying it as required for your setup.
This tutorial assumes you have MySQL and Connector/NET already installed. It also assumes that you have installed the World example database, which can be downloaded from the MySQL Documentation page. You can also find details on how to install the database on the same page.
Note
Before compiling the example code make sure that you have added
References to your project as required. The References required
are System, System.Data and
MySql.Data.
For your Connector/NET application to connect to a MySQL database
it needs to establish a connection. This is achieved through the
use of a MySqlConnection object.
The MySqlConnection constructor takes a connection string as one of its parameters. The connection string provides necessary information to make the connection to the MySQL database. The connection string is discussed more fully in Section 20.2.4.2, “Connecting to MySQL Using Connector/NET”. A reference containing a list of supported connection string options can also be found in Section 20.2.5, “Connector/NET Connection String Options Reference”.
The following code shows how to create a connection object.
using System;
using System.Data;

using MySql.Data;
using MySql.Data.MySqlClient;

public class Tutorial1
{
    public static void Main()
    {
        string connStr = "server=localhost;user=root;database=world;port=3306;password=******;";
        MySqlConnection conn = new MySqlConnection(connStr);
        try
        {
            Console.WriteLine("Connecting to MySQL...");
            conn.Open();
            // Perform databse operations
            conn.Close();
        }
        catch (Exception ex)
        {
            Console.WriteLine(ex.ToString());
        }
        Console.WriteLine("Done.");
    }
}
When the MySqlConnection constructor is invoked
it returns a connection object, which is used for subsequent
database operations. The first operation in this example is to
open the connection. This needs to be done before further
operations take place. Before the application exits the connection
to the database needs to be closed by calling
Close on the connection object.
Sometimes an attempt to perform an Open on a
connection object can fail, this will generate an exception that
can be handled via standard exception handling code.
In this section you have learned how to create a connection to a MySQL database, and open and close the corresponding connection object.
Once a connection has been established with the MySQL database,
the next step is do carry out the desired database operations.
This can be achieved through the use of the
MySqlCommand object.
You will see how to create a MySqlCommand
object. Once it has been created there are three main methods of
interest that you can call:
ExecuteReader - used to query the database. Results are usually returned in a
MySqlDataReaderobject, created byExecuteReader.ExecuteNonQuery - used to insert and delete data.
ExecuteScalar - used to return a single value.
Once a MySqlCommand object has been created,
you will call one of the above methods on it to carry out a
database operation, such as perform a query. The results are
usually returned into a MySqlDataReader object,
and then processed, for example the results might be displayed.
The following code demonstrates how this could be done.
using System;
using System.Data;

using MySql.Data;
using MySql.Data.MySqlClient;

public class Tutorial2
{
    public static void Main()
    {
        string connStr = "server=localhost;user=root;database=world;port=3306;password=******;";
        MySqlConnection conn = new MySqlConnection(connStr);
        try
        {
            Console.WriteLine("Connecting to MySQL...");
            conn.Open();

            string sql = "SELECT Name, HeadOfState FROM Country WHERE Continent='Oceania'";
            MySqlCommand cmd = new MySqlCommand(sql, conn);
            MySqlDataReader rdr = cmd.ExecuteReader();

            while (rdr.Read())
            {
                Console.WriteLine(rdr[0]+" -- "+rdr[1]);
            }

            rdr.Close();
            conn.Close();
        }
        catch (Exception ex)
        {
            Console.WriteLine(ex.ToString());
        }
        Console.WriteLine("Done.");
    }
}
When a connection has been created and opened, the code then
creates a MySqlCommand object. Note that the
SQL query to be executed is passed to the
MySqlCommand constructor. The
ExecuteReader method is then used to generate a
MySqlReader object. The
MySqlReader object contains the results
generated by the SQL executed on the command object. Once the
results have been obtained in a MySqlReader
object, the results can be processed. In this case the information
is simply printed out as part of a while loop.
Finally, the MySqlReader object is displosed of
by running its Close method on it.
In the next example you will see how to use the
ExecuteNonQuery method.
The procedure for performing an ExecuteNonQuery
method call is simpler, as there is no need to create an object to
store results. This is because ExecuteNonQuery
is only used for inserting, updating and deleting data. The
following example illustrates a simple update to the Country
table:
using System;
using System.Data;

using MySql.Data;
using MySql.Data.MySqlClient;

public class Tutorial3
{
    public static void Main()
    {
        string connStr = "server=localhost;user=root;database=world;port=3306;password=******;";
        MySqlConnection conn = new MySqlConnection(connStr);
        try
        {
            Console.WriteLine("Connecting to MySQL...");
            conn.Open();

            string sql = "INSERT INTO Country (Name, HeadOfState, Continent) VALUES ('Disneyland','Mickey Mouse', 'North America')";
            MySqlCommand cmd = new MySqlCommand(sql, conn);
            cmd.ExecuteNonQuery();

            conn.Close();
        }
        catch (Exception ex)
        {
            Console.WriteLine(ex.ToString());
        }
        Console.WriteLine("Done.");
    }
}
The query is constructed, the command object created and the
ExecuteNonQuery method called on the command
object. You can access your MySQL database with the MySQL Client
program and verify that the update was carried out correctly.
Finally, you will see how the ExecuteScalar
method can be used to return a single value. Again, this is
straightforward, as a MySqlDataReader object is
not required to store results, a simple variable will do. The
following code illustrates how to use
ExecuteScalar:
using System;
using System.Data;

using MySql.Data;
using MySql.Data.MySqlClient;

public class Tutorial4
{
    public static void Main()
    {
        string connStr = "server=localhost;user=root;database=world;port=3306;password=******;";
        MySqlConnection conn = new MySqlConnection(connStr);
        try
        {
            Console.WriteLine("Connecting to MySQL...");
            conn.Open();

            string sql = "SELECT COUNT(*) FROM Country";
            MySqlCommand cmd = new MySqlCommand(sql, conn);
            object result = cmd.ExecuteScalar();
            if (result != null)
            {
                int r = Convert.ToInt32(result);
                Console.WriteLine("Number of countries in the World database is: " + r);
            }

            conn.Close();
        }
        catch (Exception ex)
        {
            Console.WriteLine(ex.ToString());
        }
        Console.WriteLine("Done.");
    }
}
This example uses a simple query to count the rows in the Country
table. The result is obtained by calling
ExecuteScaler on the command object.
Previously, when using MySqlDataReader, the connection to the database was continually maintained, unless explicitly closed. It is also possible to work in a manner where a connection is only established when needed. For example, in this mode, a connection could be established in order to read a chunk of data, the data could then be modified by the application as required. A connection could then be reestablished only if and when the application needs to write data back to the database. This decouples the working data set from the database.
This decouple mode of working with data is supported by Connector/NET. There are several parts involved in allowing this method to work:
Data Set - The Data Set is the area in which data is loaded in order to read or modify it. A
DataSetobject is instantiated, which can store multiple tables of data.Data Adapter - The Data Adapter is the interface between the Data Set and the database itself. The Data Adapter is responsible for efficiently managing connections to the database, opening and closing them as required. The Data Adapter is created by instantiating an object of the
MySqlDataAdapterclass. TheMySqlDataAdapterobject has two main methods:Fillwhich reads data into the Data Set, andUpdate, which writes data from the Data Set to the database.Command Builder - The Command Builder is a support object. The Command Builder works in conjunction with the Data Adapter. When a
MySqlDataAdapterobject is created it is typically given an initial SELECT statement. From this SELECT statement the Command Builder can work out the corresponding INSERT, UPDATE and DELETE statements that would be required should the database need to be updated. To create the Command Builder an object of the classMySqlCommandBuilderis created.
Each of these classes will now be discussed in more detail.
Instantiating a DataSet object
A DataSet object can be created simply, as
shown in the following example code snippet:
DataSet dsCountry;
...
dsCountry = new DataSet();
Although this creates the DataSet object it has
not yet filled it with data. For that a Data Adapter is required.
Instantiating a MySqlDataAdapter object
The MySqlDataAdapter can be created as
illustrated by the following example:
MySqlDataAdapter daCountry;
...
string sql = "SELECT Code, Name, HeadOfState FROM Country WHERE Continent='North America'";
daCountry = new MySqlDataAdapter (sql, conn);
Note, the MySqlDataAdapter is given the SQL
specifying the data you wish to work with.
Instantiating a MySqlCommandBuilder object
Once the MySqlDataAdapter has been created, it
is necessary to generate the additional statements required for
inserting, updating and deleting data. There are several ways to
do this, but in this tutorial you will see how this can most
easily be done with MySqlCommandBuilder. The
following code snippet ilustrates how this is done:
MySqlCommandBuilder cb = new MySqlCommandBuilder(daCountry);
Note that the MySqlDataAdapter object is passed
as a parameter to the command builder.
Filling the Data Set
In order to do anything useful with the data from your datbase,
you need to load it into a Data Set. This is one of the jobs of
the MySqlDataAdapter object, and is carried out
with its Fill method. The following example
code illustrates this:
DataSet dsCountry;
...
dsCountry = new DataSet();
...
daCountry.Fill(dsCountry, "Country");
Note the Fill method is a
MySqlDataAdapter method, the Data Adapter knows
how to establish a connec tion with the database and retrieve the
required data, and then populates the Data Set when the
Fill method is called. The second parameter
“Country” is the table in the Data Set to update.
Updating the Data Set
The data in the Data Set can now be manipulated by the application
as required. At some point, changes to data will need to be
written back to the database. This is achieved through a
MySqlDataAdapter method, the
Update method.
daCountry.Update(dsCountry, "Country");
Again, the Data Set and the table within the Data Set to update are specified.
Working Example
The interactions between the DataSet,
MySqlDataAdapter and
MySqlCommandBuilder classes can be a little
confusing, so their operation can perhaps be best illustrated by
working code.
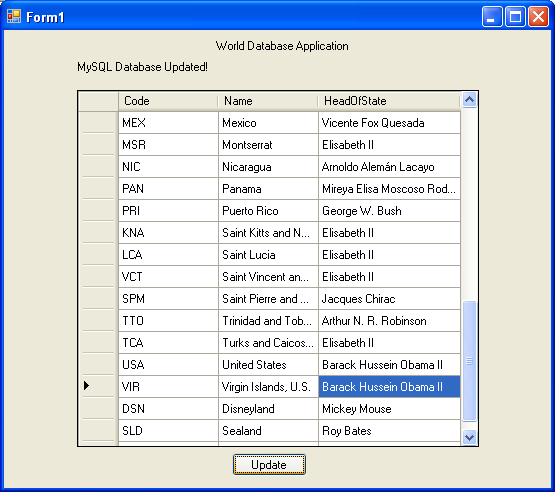
In this example, data from the World database is read into a Data Grid View control. Here, the data can be viewed and changed before clicking an update button. The update button then activates code to write changes back to the database. The code uses the principles explained above. The application was built using the Microsoft Visual Studio in order to place and create the user interface controls, but the main code that uses the key classes descibed above is shown below, and is portable.
using System;
using System.Collections.Generic;
using System.ComponentModel;
using System.Data;
using System.Drawing;
using System.Linq;
using System.Text;
using System.Windows.Forms;

using MySql.Data;
using MySql.Data.MySqlClient;

namespace WindowsFormsApplication5
{
    public partial class Form1 : Form
    {
        MySqlDataAdapter daCountry;
        DataSet dsCountry;

        public Form1()
        {
            InitializeComponent();
        }

        private void Form1_Load(object sender, EventArgs e)
        {

            string connStr = "server=localhost;user=root;database=world;port=3306;password=******;";
            MySqlConnection conn = new MySqlConnection(connStr);
            try
            {
                label2.Text = "Connecting to MySQL...";

                string sql = "SELECT Code, Name, HeadOfState FROM Country WHERE Continent='North America'";
                daCountry = new MySqlDataAdapter (sql, conn);
                MySqlCommandBuilder cb = new MySqlCommandBuilder(daCountry);

                dsCountry = new DataSet();
                daCountry.Fill(dsCountry, "Country");
                dataGridView1.DataSource = dsCountry;
                dataGridView1.DataMember = "Country";
            }
            catch (Exception ex)
            {
                label2.Text = ex.ToString();
            }
        }

        private void button1_Click(object sender, EventArgs e)
        {
            daCountry.Update(dsCountry, "Country");
            label2.Text = "MySQL Database Updated!";
        }

    }
}
The application running is shown below:
This part of the tutorial shows you how to use parameters in your Connector/NET application.
Although it is possible to build SQL query strings directly from user input, this is not advisable as it does not prevent from erroneous or malicious information being entered. It is safer to use parameters as they will be processed as field data only. For example, imagine the following query was contructed from user input:
string sql = "SELECT Name, HeadOfState FROM Country WHERE Continent = "+user_continent;
If the string user_continent came from a Text
Box control, there would potentially be no control over the string
enetred by the user. The user could enter a string that generates
a run time error, or in the worst case actually harms the system.
When using parameters it is not possible to do this because a
parameter is only ever treated as a field parameter, rather than
an arbitrary piece of SQL code.
The same query written user a parameter for user input would be:
string sql = "SELECT Name, HeadOfState FROM Country WHERE Continent = @Continent";
Note that the parameter is preceded by an '@' symbol to indicate it is to be treated as a parameter.
As well as marking the position of the parameter in the query
string, it is necessary to create a parameter object that can be
passed to the Command object. In Connector/NET the class
MySqlParameter is used for this purpose. The
use of MySqlParameter is best illustrated by a
small code snippet:
MySqlParameter param = new MySqlParameter();
param.ParameterName = "@Continent";
param.Value = "North America";
cmd.Parameters.Add(param);
In this example the string "North America" is supplied as the
parameter value statically, but in a more practical example it
would come from a user input control. Once the parameter has its
name and value set it needs to be added to the Command object
using the Add method.
A further example illustrates this:
using System;
using System.Data;

using MySql.Data;
using MySql.Data.MySqlClient;

public class Tutorial5
{
    public static void Main()
    {
        string connStr = "server=localhost;user=root;database=world;port=3306;password=******;";
        MySqlConnection conn = new MySqlConnection(connStr);
        try
        {
            Console.WriteLine("Connecting to MySQL...");
            conn.Open();

            string sql = "SELECT Name, HeadOfState FROM Country WHERE Continent=@Continent";
            MySqlCommand cmd = new MySqlCommand(sql, conn);

            Console.WriteLine("Enter a continent e.g. 'North America', 'Europe': ");
            string user_input = Console.ReadLine();

            MySqlParameter param = new MySqlParameter();
            param.ParameterName = "@Continent";
            param.Value = user_input;
            cmd.Parameters.Add(param);

            MySqlDataReader rdr = cmd.ExecuteReader();

            while (rdr.Read())
            {
                Console.WriteLine(rdr["Name"]+" --- "+rdr["HeadOfState"]);
            }

            conn.Close();
        }
        catch (Exception ex)
        {
            Console.WriteLine(ex.ToString());
        }
        Console.WriteLine("Done.");
    }
}
In this part of the tutorial you have see how to use parameters to make your code more secure.
In this section you will see how to work with Stored Procedures. This section assumes you have a basic understanding of what a Stored Procedure is, and how to create one.
For the purposes of this tutorial, you will create a simple Stored Procedure to see how it can be called from Connector/NET. In the MySQL Client program, connect to the World database and enter the following Stored Procedure:
DELIMITER //
CREATE PROCEDURE country_hos
(IN con CHAR(20))
BEGIN
  SELECT Name, HeadOfState FROM Country
  WHERE Continent = con;
END //
DELIMITER ;
Test the Stored Procedure wors as expec ted by typing the following into the MySQL Client program:
CALL country_hos('Europe');
Note that The Stored Routine takes a single parameter, which is the continent you wish to restrict your search to.
Having confirmed that the Stored Procedure is present and correct you can now move on to seeing how it can be accessed from Connector/NET.
Calling a Stored Procedure from your Connector/NET application is
similar to techniques you have seen earlier in this tutorial. A
MySqlCommand object is created, but rather than
taking a SQL query as a parameter it takes the name of the Stored
Procedure to call. The MySqlCommand object also
needs to be set to the type of Stored Procedure. This is
illustrated by the following code snippet:
string rtn = "country_hos";
MySqlCommand cmd = new MySqlCommand(rtn, conn);
cmd.CommandType = CommandType.StoredProcedure;
In this case you also need to pass a parameter to the Stored Procedure. This can be achieved using the techniques seen in the previous section on parameters, Section 20.2.4.1.4, “Working with Parameters”. This is shown in the following code snippet:
MySqlParameter param = new MySqlParameter();
param.ParameterName = "@con";
param.Value = "Europe";
cmd.Parameters.Add(param);
The value of the parameter @con could more
realistically have come from a user input control, but for
simplicity it is set as a static string in this example.
At this point everything is set up and all that now needs to be
done is to call the routine. This can be achieved using techniques
also learned in earlier sections, but in this case the
ExecuteReader method of the
MySqlCommand object is used.
Complete working code for the Stored Procedure example is shown below:
using System;
using System.Data;

using MySql.Data;
using MySql.Data.MySqlClient;

public class Tutorial6
{
    public static void Main()
    {
        string connStr = "server=localhost;user=root;database=world;port=3306;password=******;";
        MySqlConnection conn = new MySqlConnection(connStr);
        try
        {
            Console.WriteLine("Connecting to MySQL...");
            conn.Open();

            string rtn = "country_hos";
            MySqlCommand cmd = new MySqlCommand(rtn, conn);
            cmd.CommandType = CommandType.StoredProcedure;
            MySqlParameter param = new MySqlParameter();
            param.ParameterName = "@con";
            param.Value = "Europe";
            cmd.Parameters.Add(param);

            MySqlDataReader rdr = cmd.ExecuteReader();
            while (rdr.Read())
            {
                Console.WriteLine(rdr[0] + " --- " + rdr[1]);
            }
            conn.Close();
        }
        catch (Exception ex)
        {
            Console.WriteLine(ex.ToString());
        }
        Console.WriteLine("Done.");
    }
}
In this section you have seen how to call a Stored Procedure from Connector/NET. For the moment, this concludes our introductory tutorial on programming with Connector/NET.
User Comments
Add your own comment.